Create YouTube Transcript in Microsoft Word
- Joshua Crowder
- Nov 5, 2022
- 3 min read

If you ever wanted to abstract the transcript out of a YouTube Video to read it in paragraph form without having to look at timestamps, you came to the right place.
Here I will show you the simple steps to create a transcript in Microsoft Word (without timestamps) from any YouTube video that has a transcript available.
Make the YouTube Transcript Visible
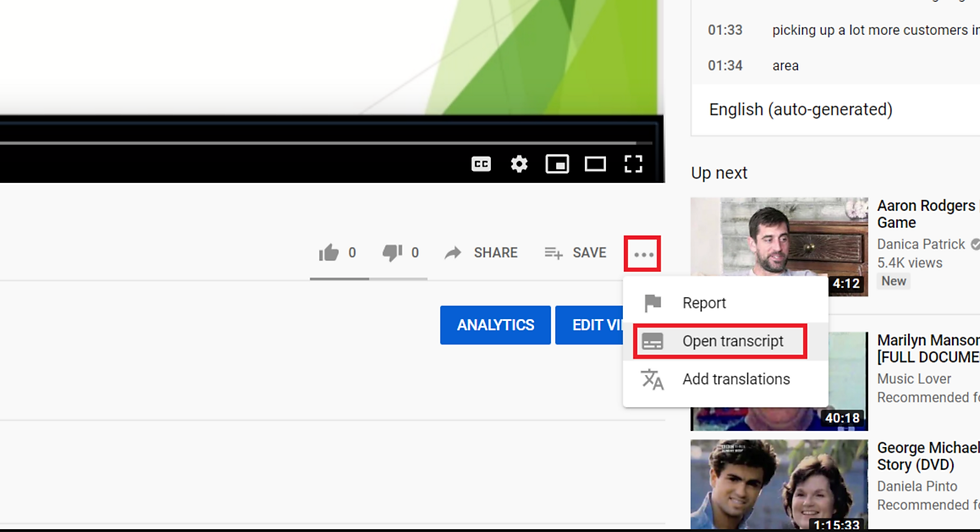
To copy a transcript from a video, go to the video that you are interested in and find the three dots beside the save button. These steps are shown in the illustration below.
Click on those three dots and click on the open transcript option. The transcript will show up on the right side of the video.
Opening the Video Transcript

Copy the YouTube Transcript
Now you can copy the complete transcript by selecting each line of the transcript from zero seconds to the end. The step is followed by right-clicking on the highlighted text and selecting copy.

Paste the Text Into Word
Open a Microsoft Word file and paste the transcript into it. Notice that the form appears to mimic the original format from the YouTube platform.
If you don’t want to deal with this formatting of the copied transcript, you can clean it up no matter how long it is.

Create a Macro to Repeat a Process
What you can do to clean this text up is to create a macro that will remove the time stamp and spacing with little work involved. More specifically, the macro can record the process of making edits that would normally take lots of effort to edit because of the amount of repetition.
After a macro is recorded, the process can be activated with a shortcut key so the process can be repeated throughout the whole document.

Make sure the cursor is on the bottom left-hand corner of the last line of text. Before recording a macro, review the process that you are going to record before starting to avoid making errors.
The goal here is to remove the timestamps and condense the lines of the transcript. I created a process that will help me do this, but you are not limited to this one process. You may be able to figure out how to make the transcript more presentable for your needs.
Starting the Macro Recording
To start recording the macro, click on the record macro button in the bottom left-hand corner of the screen.

The record macro window should appear. The macro can now be named, and a keyboard shortcut can be created. The illustration below shows each step in this shortcut assignment process.
To create the keyboard shortcut, click on the button that resembles a keyboard. Click in the shortcut box and make a shortcut like Ctrl + j. Next, click the assign button followed by the close button to start the recording.

Now we are ready to start recording. The steps to record this macro is very distinct. See the following steps below:
Begin with the cursor at the beginning of the last line. The needs to be completed before the macro is recorded.
Backspace until the last line meets the next lineup.
Create a space between the two lines that were merged.
Send the cursor to the beginning of the last line by using the home key.
Click on the macro stop button (the square shape in the lower left-hand corner).
The recording process may have a lot of trial and error. If you make a mistake, be sure to erase that macro that was recorded with an error and start over.

Repeat the Process by Running the Macro
To clean up the whole transcript, place the cursor at the beginning of the last line and use the shortcut keys that were assigned to the macro to clear out all the timestamps and spacing line by line. The final result will be one large paragraph.
To make the process faster, I could have recorded myself repeating the process a few times before I stopped recording.
Saving the Word Document as Macro-Enabled

If you would like to use the macro in this Word document in the future for other transcripts, you will have to save the workbook as a macro-enabled Word document. Make sure to choose this option when you are saving the document.
This content is accurate and true to the best of the author’s knowledge and is not meant to substitute for formal and individualized advice from a qualified professional. © 2020 Joshua Crowder
This article can also be found on Medium & ToughNickle.


Comments